Wednesday, June 2, 2010

New Pics

I haven't done much because it's the end of senior year and I have no drive to do anything, but here are some pictures showing where I'm at right now. I carved out the area around the earpieces both inwards and in distance from the edge of the earpieces. I scraped off a bunch of the front visor so I can put down a layer of spackle that doesn't suck (hopefully) so it'll be smooth...again....


In other news, I have come to the conclusion that the eintire thing is too big. I got the proportion of the whole thing compared to a human head wrong, but it's too late to go back now. Oh well....guess I'll go cry in a corner...

Tuesday, May 11, 2010

Injury...

So I made the mistake of sanding the helmet in the Gale-force winds yesterday and got particles blown back into my eye...I went to the doctor who removed the crap and gave me eyedrops to prevent an infection in my scratched cornea...what fun...oh and did I mention I had to take an AP exam while only looking to the right side out of one eye? Yeah, so I will resume working as soon as possible.

Monday, May 3, 2010

Update...

I have been doing a lot of time consuming work and don't have a lot to show for it...as of now I am building up the entire visor area becasue the difference between it and the future gold border around it was too much - if I ever plan to vac-form it, it wouldn't work out so well. Plus, it looks wrong. I am also working on the ear pieces which are taking a while because of the detail and thickness of the spackle needed on them. As soon as it looks like I've done someting of value, I'll post pictures.

Sunday, May 2, 2010

Gala Pictures

I took some pictures of the helmet all pretty at the gala with my phone...it's not the best quality but you get the idea....


I really like how the visor looks here...the curve is right on (I think...). Too bad it was actually lumpy if you felt it...oh well.

Next post: Earpieces

Next Steps...

After creating the solid cross sections, I blocked off a bunch of the "quadrants" with more cardboard so I did not waste expanding foam...I still came up short though...


What I am trying to do here is make the general shape of the helmet with something that can be manipulated easily. Mr. Krix used expanding foam also but a different kind (I think) that looks easier to work with.

I needed my dad's help to hold the helmet while I mixed and quickly spread the foam beofre it salidified. Due to gravity, the foam ran out of the sides and did not really end up in the best shape, but it was good enough, and resulted in a very light model. I probably should have built more "dams" or resorvoirs to hold the foam so It did not slide off as easliy while it was a liquid. I poured one "quadrant" at a time obviously due to gravity, and I highly reccomend cutting away the excess of that section before pouring the next one (I used a coping saw) so you know the general boundaries of the helmet as shown here:


After all sections were poured, I used extra foam in each section to build up the dome shape. After cutting and sanding (using a respirator), this is what I had:


Now came arguably the WORST part of the entire process (so far)...using the Magic Smooth. The concept of using this stuff was to be able to build up on top of the foam to get the surface smooth and in the shape that it needed to be. I was told that it would sand, which it didn't. Both wet and dry sanding did not work whatsoever, either the sandpaper ripped or the resin stuff cacked on the sandpaper instantly. It was a total pain to mix (EVERYTHING got sticky and you needed water and a lot of room to work with it). Some parts of it never even dried and to this day are sticky...I dont know what I did wrong, but do yourself a favor and don'ts use this (you can SEE the wetness and stickyness):


Mr. Krix used Bondo and Spot Putty which I am not famillar with but must work better than this. I dealt with this **** for a while, weeks probably, and was trying to find ways to work around it. I went to ACE Hardware and picked up "Waterproof Epoxy Putty" (a lot of them....they're small), but that didn't work either. The volume of material was too small, it was too hard to work the two parts together, and it hardened in less than 5 minutes, so there was barely any working time (it's the gray spots):


Even though this process suced, I got a good, long look at the overall shape of the helmet and drew out plans for the future ear pieces and gold framing as seen in the last pic (drawn in black crayon).

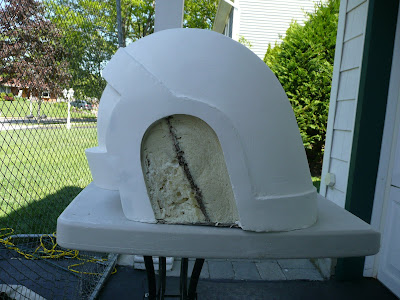
I was doing this for about two weeks when the teacher at the art school came up with the idea to use gypsum spackling paste. God, I wish he had thought of this sooner. After seeing how easliy the spackle spreads and sands, I should have used this directly on the foam in the first place without ever using he Magic Smooth and Epoxy Putty. This is the first run:

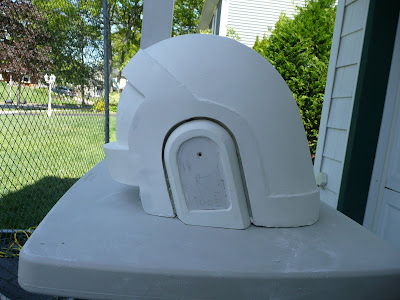
Second run...looks a lot better, don't it?:


Although it doesn't look like it, a lot was done between the previous picture and next. I went through (and am still going through) a process where I put spackle on and sand it off evenly to see where I need to build up and where to take away. It's very time consuming but I am able to see even minor imperfections in the curve of the visor that will be visible when it is glossy black later on. Also, in order to build up the raised area around the visors, I had to put many thin coats on so the spackle didn't crack.


At this point, I needed to have something to put in the gala at my art school, since my project was obviously nowhere near done. With the help of the teacher previously mentioned, I measured and he cut out beveled ear pieces out of what appears to be poplar wood. I sanded the whole thing nice and primed everything in white and it actually looked pretty good for the show. I don't have a picture of it at the show as of now (ironically), but here is one of it with the ear pieces on, unsanded and unprimed:


As of now, I am using spackle to further refine everything. I made a huge mistake by using vinyl spackle instead of spackling paste, so watch out for that because vinyl does not sand (just one problem after another...). I am also detailing the ear pieces as well and will have pictures of those up soon (hopefully). after this, I hope it will be good enough to put together, clear-coat, and mold.

To be continued...

First Steps

After deciding that I wanted to attept to fabrcate my own Daft Punk Guy-Manuel deHomem-Christo helmet, I purchased expanding foam, Magic Smooth, "Rebound" rubber for casting, and "SmoothCast" plastic from "The Compleat Sculptor" on Vandam Street in Manhattan for about $220. Unfortunately, I most likely never needed the expanding foam, and definitely did not need the Magic Smooth, as it was complete garbage and did not sand whatsoever and was a total pain in the ***

Anyway, before I used any of that stuff (I still haven't touched the Rebound or Smmoothcast...), I had to make sure I was going to create a scale model to cast in the end, so the size and proportions of everything are essential, especially in the early stages. At the art school I go to, one of the teachers helmped me plan everything out and take measurements of my head. We then figured out how much room was needed inside the helmet shell for padding, how thick the padding and helmet shell itslef would be, and finally the outside dimensions of the helmet. These were all recorded on what developed into very architectural-looking plans that I doubt anyone besides myself could interpret...


These drawings and measurements were then used to plan out (in full size) the cross sections of the helmet on cardboard. The thickness of the cardboard is the thickness of the future shell and padding (with a little excess for stability). This was to make sure the dimensions weren't too big or small. Some tweeking ws done here to make sure the helmet wouldn't be too small in the end.


I did this for both cross sections and attached a bottom "ring" to create a wearable "prototype":


Next, I traced these cross sections onto cardboard without taking out the inside so I could put them together to build up off of (on the left):


Next post will have expanding foam and Magic Smooth documentary.

Attention

For the record, essentially my entire process was inspired by Harrison Krix of “Volpin Props” who is making (in my opinion) the most accurate replica of Guy-Manuel’s helmet. Looking back on it, I could have done a lot of things differently, as I tried to copy his process exactly, which was not the most efficient way for me to go about this project.

*IMPORTANT*

If you are attempting to construct your own helmet, do NOT follow my process as I have documented it. I will be posting both what I did and what I should have done at each step. I ran into countless problems along the way and would not want to send anyone else down that path!